First steps with MaxQuant
The descriptions and screenshots in this tutorial refer to the MaxQuant GUI around version 1.4.3.14 from August 2014.
In case you are a first time user, you might be worried by the many options and parameters that one can set in the user interface. If this is the case, we have good news for you. In almost all user cases the standard values of most parameters are fine and you only need to adjust a small number of factors. Typically there is only little information that you need to provide. Every parameter in the interface has context help which you obtain by hovering with the mouse pointer over the text string for this parameter. This documentation also has that information, and more.
You will have to tell MaxQuant where to find your raw data files and your fasta files, and which labels and digestion enzymes you are using. 90% of the time that will be enough, and you can leave the rest of the bells and whistles on their default values. Of course, we are assuming you have successfully installed and started MaxQuant, and that you can find the Start button once you have finished entering the processing parameters (hint: look in the lower left corner of the GUI). Below are more details on how to enter those four most important parameters:
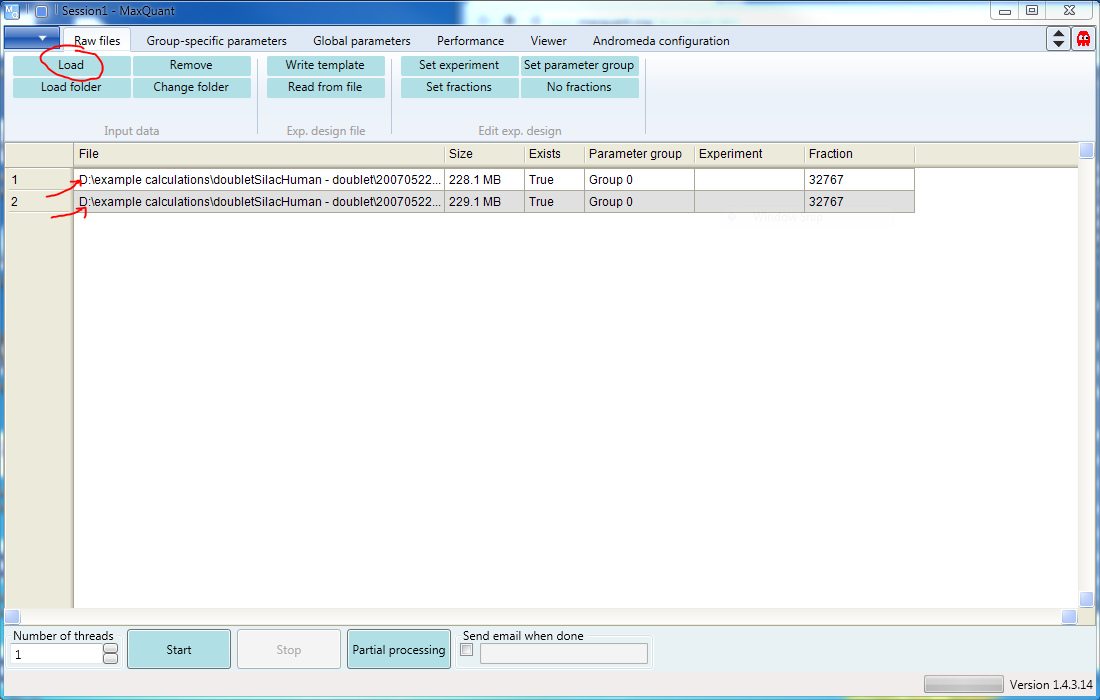
1 Entering Raw data
Along the top of the GUI there are six tabs. The first of these is Raw files. Select that tab, then click “Load” to open a browser where you can select the file containing your raw data. You can select any number of files. You can also select all the raw data files in a single folder by using the “Load folder” button (s. Figure 1). In the screen shot, two files have been loaded. (If you still have questions, there is a page that goes into details about the Raw Files tab)
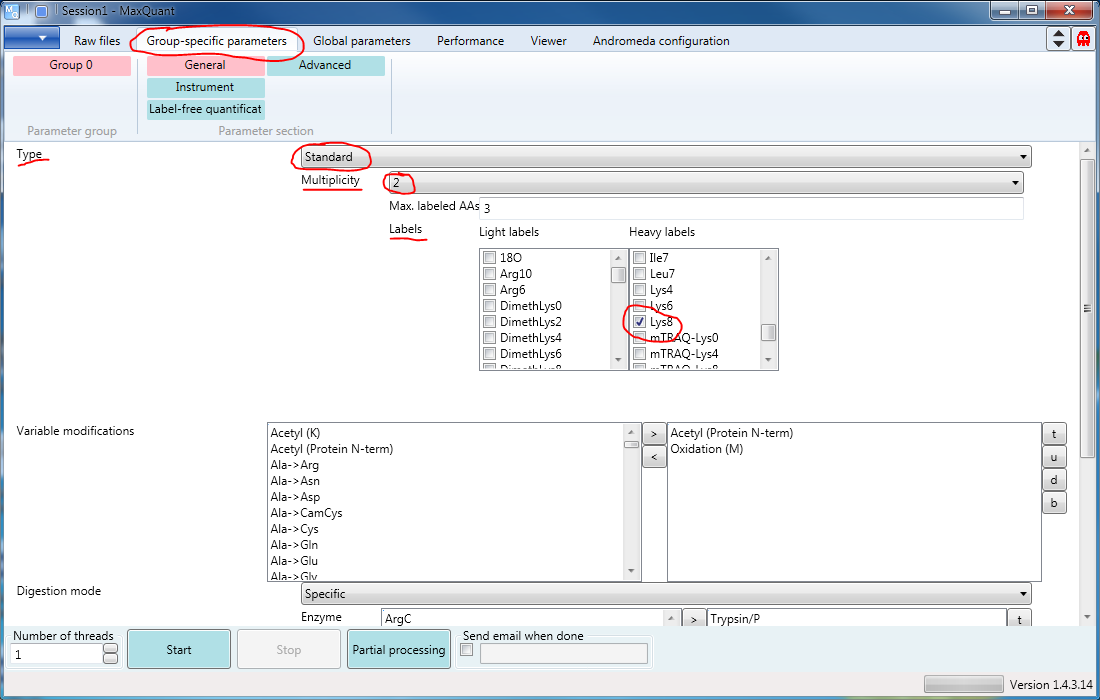
2 The Labels
The second tab is Group-specific parameters. You need to go there to specify your labels. The “Type” will usually be “Standard” (obviously), and the “Multiplicity” will be \(1\) for label-free quantification, \(2\) if you have light and heavy labels, and \(3\) if you have light, medium, and heavy. Any number of labels can be checked in the lists. In this example, the light sample is unlabeled and the heavy sample has been labeled with Arg10 and Lys8. (You can’t see them both without scrolling. Figure 2)
3 Enzymes
Also under the Group-specific parameters tab, you should enter the Enzyme(s) (one or more) with which you have digested your proteins. They can be moved from the list at the left and back with the arrow buttons, and the order changed with the “t” (to top), “u” (up one place), “d” (down one place), and “b” (to bottom) buttons. In this example (s. Figure 3), we used Trypsin/P.

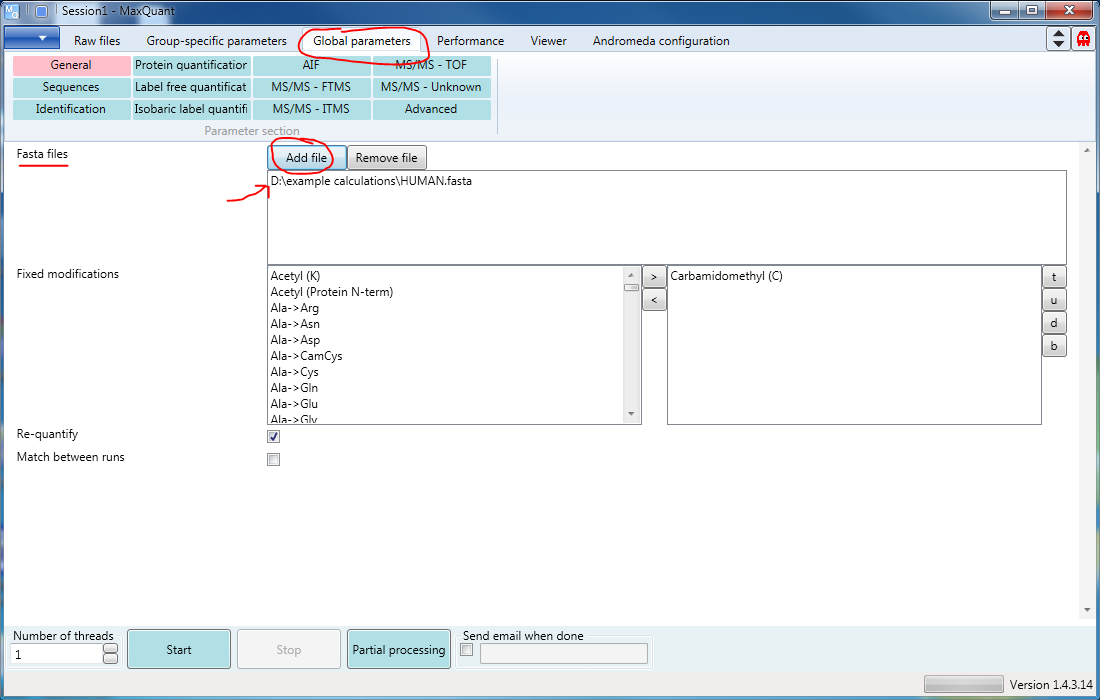
4 Load FASTA file
Finally you will need to go to the third tab (s. Figure 4), “Global parameters” to specify where to find the Fasta files (one or more) you want to use. The Add file button will open a file browser.
5 Start the Analysis
After you press the Start button, you can monitor the progress of the analysis under the fourth tab, Performance. A popup window saying ‘Done’ will appear when MaxQuant is finished. All result files will appear in the folder …\combined\txt as tab-delimited text files. A pdf document with a description of all columns in all tables will be written to …\combined\txt\tables.pdf.
The fifth tab is the Viewer, used to examine the results of the analysis, which will be the topic of the viewer tutorial. All columns have interactive descriptions in the Viewer program. Just move the mouse over the beginning of the column title and click on the question mark that will appear.
The sixth and final tab is Andromeda configuration. Andromeda is the peptide search engine, which needs to know what modifications, proteases, and sequence databases to take into consideration. Almost all that you will ever need are pre-configured, but you can use the buttons under this tab to add more, if your experiment requires it.
That’s how easy it can be!
For question or problems with the running MaxQuant we would love to hear from you under Contact.